Painting mason jars is a delightful and creative way to add a personal touch to your home decor or special events. By following a few simple steps, you can transform plain glass jars into beautiful and unique pieces that reflect your style and personality. This guide will provide you with the necessary instructions to paint mason jars like a pro.
Whether you are a novice or an experienced crafter, this activity offers a sense of belonging as you engage in the artistic process and create something meaningful. With a professional tone and language that resonates with your desire for connection and self-expression, this introduction sets the stage for an enjoyable journey into the world of painting mason jars.
Key Takeaways
- Choose the desired size and shape of mason jars and ensure they are clean and dry before starting.
- Select high-quality acrylic paint in desired colors and have a selection of different brush sizes.
- Consider using warm soapy water, rubbing alcohol, or vinegar solution to clean the jars and lightly sand the surface to create a rough texture.
- Follow the manufacturer’s instructions for the paint and allow the jars to dry completely before moving on to adding additional layers and designs.
Gather Supplies
To begin the process of painting mason jars, gather the necessary supplies. Adding embellishments and experimenting with different techniques can transform plain mason jars into beautiful decorative pieces. Here’s what you’ll need. Wondering for more information on this topic Seal Mason Jars
- Mason jars: Choose the desired size and shape of mason jars that you want to paint. Ensure they are clean and dry before starting.
- Acrylic paint: Select high-quality acrylic paint in the colors of your choice. Consider using a variety of colors to create a vibrant and eye-catching design.
- Paintbrushes: Have a selection of different brush sizes to accommodate various painting techniques. A flat brush is ideal for covering larger areas, while a small detail brush is perfect for adding intricate designs.
- Embellishments: Gather decorative items like ribbons, lace, glitter, or beads to further enhance your painted mason jars.
Clean and Prep Jars
Before painting mason jars, it is important to properly clean and prepare them. Cleaning the jars ensures a smooth surface for the paint to adhere to, while prepping them helps to prolong the life of the paint job. There are several cleaning methods you can use, such as washing with warm soapy water, using rubbing alcohol, or using a vinegar solution.
Choose the method that works best for you based on the level of dirt or residue on the jars. Once the jars are clean, it’s time to prep them. This involves sanding the surface lightly to create a rough texture for the paint to grip onto. You may want to use a primer to create an even base for the paint.
When it comes to paint brands, it is recommended to use ones specifically designed for glass or ceramics to ensure long-lasting results. Some popular brands include FolkArt and Martha Stewart Crafts. Remember to follow the manufacturer’s instructions for best results.
| Cleaning Methods | Best Paint Brands |
|---|---|
| Warm soapy water | FolkArt |
| Rubbing alcohol | Martha Stewart |
| Vinegar solution | Crafts |
Choose Your Paint
When selecting paint for your mason jars, it is important to choose a high-quality brand specifically designed for glass or ceramics. Here are four different types of paints for mason jars and tips on how to achieve different finishes:
- Acrylic paint: This versatile paint is available in a wide range of colors and finishes, including matte, satin, and glossy. It is easy to work with and dries quickly, making it a popular choice for beginners.
- Glass paint: Made specifically for glass surfaces, this paint provides a translucent finish that allows light to pass through. It is perfect for creating a stained glass effect or adding a touch of color to your jars.
- Chalkboard paint: Transform your mason jars into functional chalkboard labels by using chalkboard paint. This paint creates a matte, writable surface that can be easily personalized.
- Spray paint: If you want to achieve a smooth, even finish, spray paint is the way to go. Make sure to choose a spray paint specifically formulated for glass or ceramics to ensure maximum adhesion and durability.
Apply Base Coat
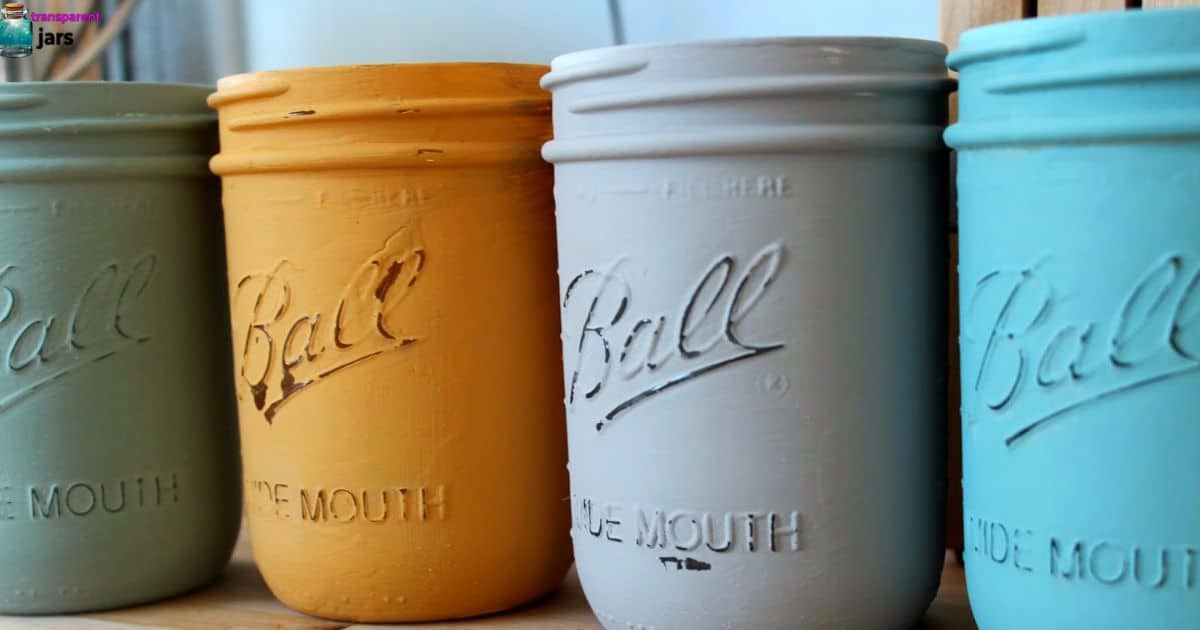
To start painting your mason jars, begin by applying a base coat of paint. The base coat serves as the foundation for your design and helps the colors to stand out. Before you start, make sure your jars are clean and dry. Choose a color that complements your overall design. Apply the base coat using a soft-bristle brush or a foam brush, making sure to cover the entire surface evenly.
If you want to create a unique look, try blending colors by applying multiple coats of different shades. Allow the base coat to dry completely before moving on to the next step. If you encounter any issues, such as streaks or uneven coverage, troubleshoot by gently sanding the surface and applying another thin layer of base coat.
Add Additional Layers
After applying the base coat, it is essential to add additional layers of paint to achieve the desired look for your painted mason jars. Adding texture and experimenting with colors can give your jars a unique and personalized touch. Here are four steps to help you add additional layers to your painted mason jars:
- Choose complementary colors: Select colors that work well together and complement the base coat. This will create a visually appealing and cohesive look.
- Apply a second coat: Start by applying a second coat of paint using a brush or sponge. Make sure to cover any visible patches and ensure an even application.
- Experiment with techniques: Use different techniques like sponging, dabbing, or swirling the paint to add texture and dimension to the jars. This will create an interesting visual effect.
- Allow drying time: Let each layer of paint dry completely before adding another layer. This will prevent smudging or mixing of colors and ensure a smooth finish.
Create Designs or Patterns
To further enhance the visual appeal of your painted mason jars, explore the possibilities of creating unique designs or patterns that will make them stand out. One technique you can try is color blending. Start by selecting two or more colors that complement each other. Apply one color to the jar, then while it’s still wet, add drops of the second color. Use a brush or sponge to blend the colors for a beautiful gradient effect.
Another way to create precise designs is by using stencils. Stencils are pre-cut patterns that you can place on the jar and paint over. They come in various shapes and designs, allowing you to personalize your mason jars according to your taste. Simply secure the stencil onto the jar, then carefully apply paint over it. Remove the stencil once the paint is dry, revealing a crisp and intricate design.
Now that you’ve created your unique designs or patterns, it’s time to seal and protect them. To ensure the longevity of your beautifully painted mason jars, it is essential to seal and protect them. Here are some steps you can follow to prevent chipping and select the best sealant options:
- Clean the jars: Before applying any sealant, make sure the jars are clean and dry to ensure proper adhesion.
- Choose the right sealant: There are various sealant options available, such as clear acrylic spray or polyurethane. Select a sealant that is suitable for glass surfaces and provides a protective barrier against moisture and UV rays.
- Apply the sealant: Hold the spray can or brush at a distance of about 6 inches from the jar’s surface. Apply thin, even coats, allowing each layer to dry before applying the next.
- Cure and dry: After applying the sealant, let the jars cure and dry completely for at least 24 hours. This will help the sealant to fully bond and protect the paint.
Display and Enjoy
Once the painted mason jars have been properly sealed and protected, they can now be proudly displayed and enjoyed. Displaying your painted mason jars is a great way to add a touch of personality and charm to any space. There are various styling options to choose from, depending on your taste and the overall aesthetic you want to achieve.
You can arrange them in a cluster on a shelf or mantel, use them as vases for fresh flowers, or even incorporate them into your DIY projects. Mason jars can be transformed into beautiful candle holders, storage containers, or even hanging lanterns.
The possibilities are endless! So go ahead and showcase your creativity by displaying your painted mason jars in a way that reflects your style and adds a unique touch to your home decor.
Frequently Asked Questions
How Long Does It Take for the Paint to Dry on the Mason Jars?
The drying time of paint on mason jars depends on the type of paint used. Generally, it takes anywhere from 1-2 hours for acrylic paint to dry completely. Oil-based paints may take up to 24 hours to fully dry.
Can I Use Regular Acrylic Paint for This Project?
When it comes to painting mason jars, regular acrylic paint can be a suitable option. There are alternative paint options available that can provide a smoother and more even finish. Here are some tips for achieving a professional-looking result.
Do I Need to Sand the Mason Jars Before Painting?
Before painting mason jars, it is recommended to sand them to create a smooth surface for better paint adhesion. Sanding helps remove any imperfections and allows the paint to adhere more evenly.
Can I Use Spray Paint Instead of Brush-On Paint for the Base Coat?
When considering painting mason jars, it is important to explore alternative options such as spray paint for the base coat. While there are pros and cons to this method, it provides a different technique for achieving desired results.
Can I Use the Painted Mason Jars for Holding Food or Drinks?
Using painted mason jars for home decor is a popular trend. When it comes to using them for holding food or drinks, it is important to consider the type of paint used. Certain paints may not be food-safe, so it is recommended to use paints specifically designed for food contact.
Conclusion
Painting mason jars is a creative and enjoyable craft that allows you to add a personal touch to your home decor. By following these step-by-step instructions, you can transform plain jars into beautiful works of art. How to Paint Mason Jars
With a little effort and the right supplies, you can create stunning designs and patterns that will impress everyone who sees them. Gather your supplies, get creative, and start painting those mason jars today.