To paint mason jars rustic, start by cleaning them well with soap and water. Once dry, apply a base coat of paint using a brush or spray. Let it dry completely before adding a second coat for a more even finish. Then, use sandpaper to gently distress the jars for that rustic look.
Learn how to paint mason jars rustic-style in a few simple steps. With some paint, brushes, and a bit of creativity, transform plain jars into delightful decor pieces. Dive in and discover the art of giving mason jars that cozy, weathered look effortlessly. How to paint mason jars rustic?
Painting mason jars in a rustic style doesn’t demand an artist’s touch. Simple supplies and a clear method make it accessible to anyone. Carpenter Bee Trap With Mason Jar Cleaning the jars thoroughly is the starting point then, a base coat lays the foundation. Patience is key; allowing each layer to dry completely ensures a perfect rustic finish.
Choosing The Right Mason Jars For A Rustic Look
When you’re aiming for a rustic look with Mason jars, the type of jar you choose matters. Opt for clear glass jars with simple designs and minimal embellishments. Look for traditional Mason jar styles like Ball or Kerr jars as they offer a classic, timeless appeal for rustic projects.
Select Mason jars with smooth surfaces and minimal logos or markings to make painting and distressing easier. Avoid jars with intricate patterns or raised designs as they might interfere with achieving that sought-after rustic appearance.
Preparing Mason Jars For Painting
Preparing Mason jars for painting is simple. Clean the jars thoroughly with soap and water. Make sure they’re dry before starting. Then, use rubbing alcohol to wipe the surfaces. This helps remove any remaining grease or residue, ensuring the paint sticks well.
Protect areas you don’t want to paint. Cover the lids or any parts you want to keep as they are. Lastly, sand the surface lightly with fine-grit sandpaper. This helps the paint adhere better and creates a smoother finish. Once these steps are done, your Mason jars are ready for a beautiful paint job.
Essential Materials And Tools For Painting Rustic Mason Jars
To paint Mason jars with a rustic look, you’ll need a few key materials and tools. Gather acrylic paints in earthy tones like brown, beige, or muted greens to achieve that rustic vibe. These paints work well for distressing and blending.
Moreover, don’t forget primer and sealant sprays specifically designed for glass surfaces. These help the paint adhere better to the Mason jars and ensure durability once the painting is complete. Lastly, gather some old rags or sponges for techniques like dry brushing or dabbing that add texture and depth to your rustic painted Mason jars.
Creating A Distressed Effect On Mason Jars
Creating a distressed effect on Mason jars is simple and adds rustic charm to your decor. Start by cleaning the jars thoroughly and ensuring they are dry. Next, choose your paint colors typically, a base coat followed by a contrasting top coat works well. Apply the base coat evenly to the jar and let it dry completely.
After distressing, apply the top coat of paint. Let it dry partially, then use a damp cloth or paper towel to rub and remove some of the top layer, revealing the distressed areas underneath. Experiment with different pressures and techniques to achieve the desired level of distressing.
Selecting Colors For A Rustic Aesthetic
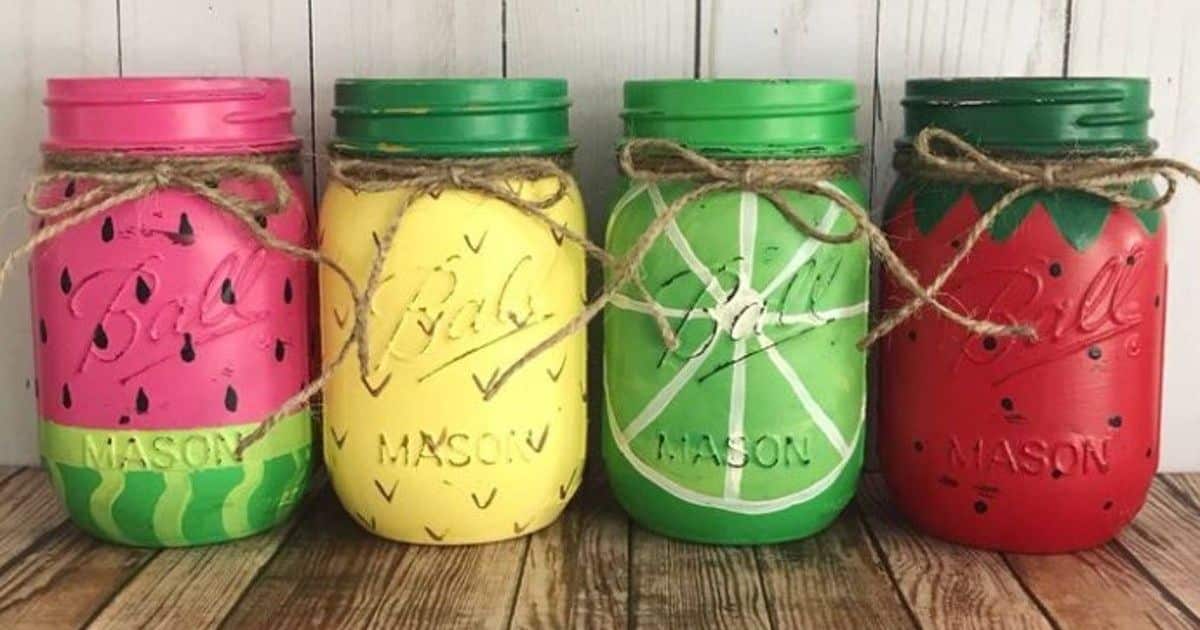
When picking colors for a rustic look, think earthy. Browns, greens, and muted tones work great. Rustic vibes often come from nature, so imagine the colors you’d find in a cozy cabin or a serene forest. Deep reds or warm yellows also add a rustic touch. These colors evoke feelings of comfort and warmth, making your mason jars feel cozy and inviting.
To create contrast, pair darker shades with lighter ones. Think about using a base color like a soft beige or cream and adding accents with darker tones. This contrast adds depth and highlights the rustic texture you might want to achieve.
Using Layering And Dry Brushing For Rustic Mason Jar Painting
Layering and dry brushing are cool ways to give Mason jars a rustic vibe. To do this, start by applying a base coat of paint to the jar. Once it’s dry, use a different paint color and lightly brush it over the base coat. This technique adds depth and texture, making the jar look weathered and vintage.
Dry brushing is all about using a small amount of paint to create a worn-out appearance. Start with a light touch, gradually adding more layers if needed. Layering allows colors to peek through, creating a distressed and aged look on your Mason jar.
Incorporating Natural Elements In Rustic Mason Jar Designs
When making rustic Mason jar designs, using natural elements brings a charming touch. Start by collecting items like twine, dried flowers, or small branches. Wrap twine around the jar’s neck or glue it in patterns for a rustic feel. Fill jars with dried flowers or place small branches inside for an earthy vibe.
Experiment by combining different natural materials in your Mason jar designs. The key is to keep it simple and let the natural elements speak for themselves. Whether using twine, dried flowers, or tiny branches, these additions infuse a rustic charm into your Mason jar creations, perfect for adding a touch of nature to any space.
Sealing And Protecting Painted Mason Jars

Once your Mason jars are beautifully painted, it’s important to protect them so they stay looking lovely. Sealing your painted jars helps keep the colors vibrant and guards against scratches. Choose a sealant that’s compatible with the paint you used typically, a clear acrylic sealer works well.
When handling sealed jars, be gentle to avoid scratching the surface. To clean them, use a soft, damp cloth rather than abrasive cleaners. Properly sealed and cared-for painted Mason jars can maintain their rustic charm for a long time, adding a touch of handmade beauty to your space.
Enhancing Rustic Charm Decorating Painted Mason Jars
Enhancing the rustic charm of painted Mason jars involves simple yet creative techniques. You can achieve this by using natural elements like twine, burlap, or lace to wrap around the jar’s neck or base. These materials add texture and a quaint touch to the jars.
Another way to enhance their charm is by incorporating dried flowers, wheat stalks, or simple greenery into the jars. These natural elements bring a sense of the outdoors indoors, adding a rustic, country feel to your décor.
Creative Ideas For Rustic Painted Mason Jars
Rustic painted mason jars open doors to endless creativity. Use them as quaint flower vases, adding a touch of countryside charm to your home. Arrange wildflowers or dried wheat stalks inside for a rustic centerpiece at family gatherings or weddings.
Repurpose them as kitchen storage. Fill them with colorful spices or grains, labeling each paint mason jars rustic for a rustic and organized pantry. Don’t hesitate to get inventive, turn them into pencil holders, planters, or even as holders for bathroom essentials like cotton balls.
Frequently Asked Questions
How do you paint a mason jar to make it look rustic?
To paint a mason jar in a rustic style, start by cleaning the jar thoroughly with soap and water. Dry it completely before painting.
How do you make mason jars look cute?
To make mason jars look cute, start by cleaning them thoroughly to remove any dirt or labels. Once clean, decide on a theme or color scheme that matches the desired cute look.
How do you paint jars to look like mercury glass?
To make jars look like mercury glass, clean them well first. Mix equal parts water and white vinegar in a spray bottle.
Conclusion
Painting jars to mimic mercury glass is a simple yet effective way to add a touch of elegance to your decor. Begin by thoroughly cleaning the jars, then apply a water-vinegar mix inside to create an adhesive surface for the paint. Spraying a mirror-like paint inside the jars and dabbing gently with a paper towel creates the desired mercury glass effect.
This technique offers versatility in enhancing various glass objects, allowing you to transform plain jars into stunning decorative pieces. By following these steps of cleaning, spraying, and dabbing, you can achieve a beautiful mercury glass look that elevates the charm of your space.